はじめに
前回でNotionのページidをurlに指定することで指定のNotionコンテンツをNext.jsから配信できるようにしました。
ただし、Notionのページidをユーザーが知っていないと正しくNotionコンテンツを配信できていなかったので、まだ自分の作成したNotionコンテンツをユーザーに届けられる状態ではありませんでした。
今回はrails側からデータベースにご自身が作成したNotionのページIDを登録してNext.jsのcareer一覧画面から登録したNotionコンテンツを開くことができるようにしていきます。
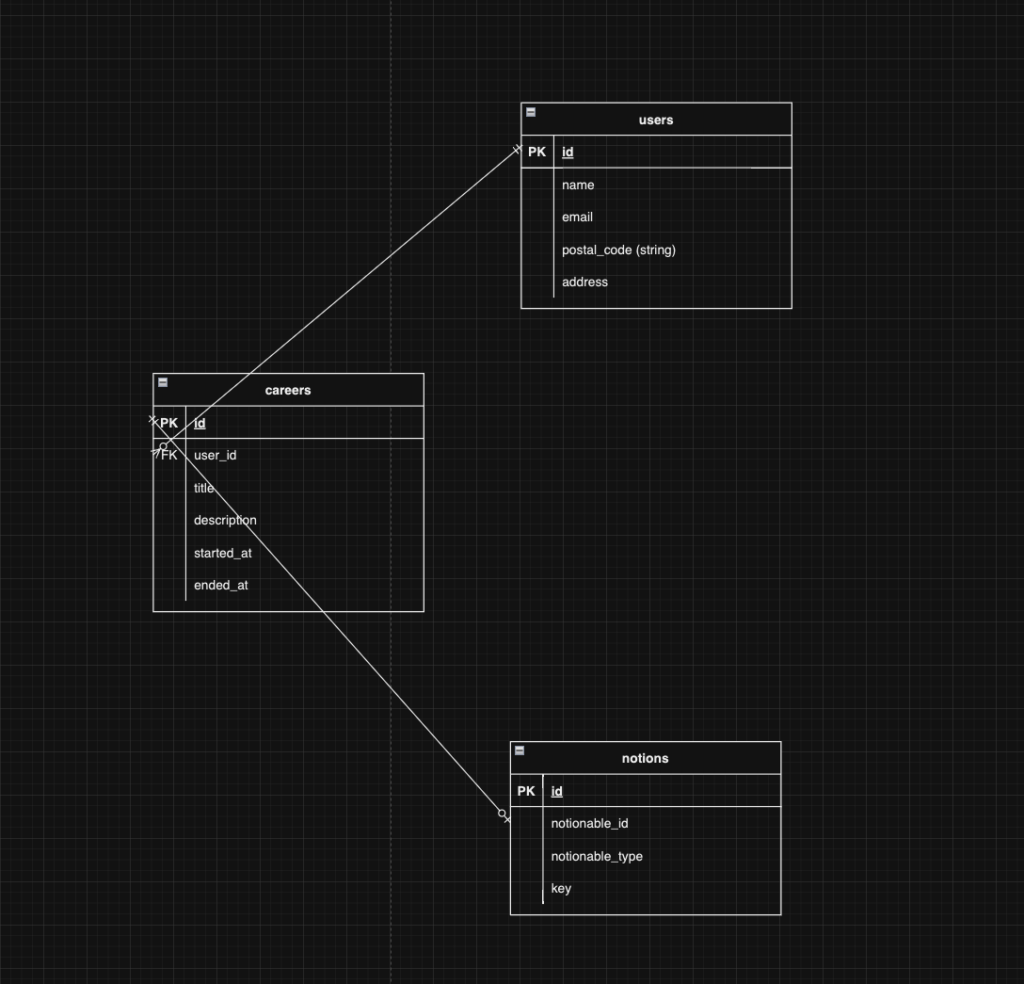
そのために、まずはcareersテーブルとは別にnotionsテーブルを作成してそこにnotionのページIDを登録できるようにします。このnotionsテーブルをcareersテーブルと紐付けます。
現在実装済みのcareerの登録フォームからnotionのページIDも登録できると便利です。一つのフォームcareerとnotionの両方のテーブルを操作するにあたってFormオブジェクトというRailsの実装パターンをご紹介します。
また、notionsテーブルはcareersテーブル以外にもまだ作成していないblogsテーブルやporfoliosテーブルとも紐づける予定です。そのためにnotionsテーブルは複数のテーブルの子テーブルにできるようにします。これを実現するためにRailsのポリモーフィック関連付けを使っていきます。
最後にcareersのapiを修正して、next.js側でNotionのコンテンツを表示するためのリンクを作成して導線を確保します。
ゴールの確認
careersモデルとnotionsテーブルとのリレーションにポリモーフィック関連付けを行う
Formオブジェクトを使って一つのフォームからcareerとnotionテーブルをスマートに作成・更新する
ユーザーへのNotionコンテンツを配信する導線を確保する
ここでの差分はgithubにあげています。困った際には参考にしてみてください
ポリモーフィック関連付け
ポリモーフィック関連付けとは、子テーブルが複数の親テーブルを持つことができるようにするデータベースの実装パターンの一つです。
Railsでは一般的に「⚪︎⚪︎able」という名前でもってポリモーフィック関連付けの親テーブルを表現します。そして、その⚪︎⚪︎able_idと⚪︎⚪︎able_typeの二つのカラムを使ってリソースを1に特定します
テーブル設計・作成
ER図

これを作成していきましょう。
rails g model Notionclass CreateNotions < ActiveRecord::Migration[7.0]
def change
create_table :notions do |t|
t.string :key
t.references :notionable, polymorphic: true
t.timestamps
end
end
endrails db:migrateこれでテーブルが作成できるかと思います。
t.references :notionable, polymorphic: true
これによって、notionable_idとnotionable_typeのカラムが自動で作成されます。
idには通常通り外部テーブルのidが入り、typeにはそのモデル名が文字列で入ります。
モデル作成
class Career < ApplicationRecord
  has_one :notion, as: :notionable, dependent: :destroy

  validates :title, presence: true
  validates :description, presence: true, length: { maximum: 500 }
  validates :started_at, presence: true
end
class Notion < ApplicationRecord
  belongs_to :notionable, polymorphic: true

  validates :key, presence: true
end
has_one :notion, as: :notionable, dependent: :destroy
careerは一つのnotionレコードをもち、notionから見た時はnotionableと呼ばれます。careerが削除されたらnotionも削除します。
belongs_to :notionable, polymorphic: true
notionable(careers, blogs. porfolios)に紐づきます。ポリモーフィック関連です。
という設定です。
動作確認
コンソールを使って実際の使用感を確認してみます。
コンソールを起動しましょう。
rails cまずは基準となるcareerをとる
[2] pry(main)> career = Career.first
Career Load (1.0ms) SELECT `careers`.* FROM `careers` ORDER BY `careers`.`id` ASC LIMIT 1
=> #<Career:0x0000ffffb09005a0
id: 1,
user_id: 1,
title: "career title1",
description:
"Lorem ipsum dolor sit amet, consectetur adipiscing elit, sed do eiusmod tempor incididunt ut labore et dolore magna aliqua. Ut enim ad minim veniam, quis nostrud exercitation ullamco laboris nisi ut aliquip ex ea commodo consequat.",
started_at: Sun, 16 Jun 2024,
ended_at: Mon, 17 Jun 2024,
created_at: Sun, 16 Jun 2024 00:00:00.000000000 UTC +00:00,
updated_at: Sun, 16 Jun 2024 00:00:00.000000000 UTC +00:00>
notionメソッドを使ってnotionをから探してみるがまだなにも作成していないのでnil
[3] pry(main)> career.notion
Notion Load (1.3ms) SELECT `notions`.* FROM `notions` WHERE `notions`.`notionable_id` = 1 AND `notions`.`notionable_type` = 'Career' LIMIT 1
=> nil
careerに紐づくnotionインスタンスを作成する
[4] pry(main)> new_notion = career.build_notion
notionable_typeには"Career"が埋まる。これはrailsが裏でやってくれている。
=> #<Notion:0x0000ffffb11f6c40 id: nil, key: nil, notionable_type: "Career", notionable_id: 1, created_at: nil, updated_at: nil>
Notionのページidをkeyに入れる
[5] pry(main)> new_notion.key = "cabf1c78b8f6496ba06197b8db6bab76"
=> "cabf1c78b8f6496ba06197b8db6bab76"
保存する
[6] pry(main)> new_notion.save!
TRANSACTION (0.6ms) BEGIN
Notion Create (1.0ms) INSERT INTO `notions` (`key`, `notionable_type`, `notionable_id`, `created_at`, `updated_at`) VALUES ('cabf1c78b8f6496ba06197b8db6bab76', 'Career', 1, '2024-06-29 07:39:18.366695', '2024-06-29 07:39:18.366695')
TRANSACTION (2.9ms) COMMIT
=> true
careerからnotionを探してヒットする
[7] pry(main)> career.notion
=> #<Notion:0x0000ffffb11f6c40 id: 1, key: "cabf1c78b8f6496ba06197b8db6bab76", notionable_type: "Career", notionable_id: 1, created_at: Sat, 29 Jun 2024 07:39:18.366695000 UTC +00:00, updated_at: Sat, 29 Jun 2024 07:39:18.366695000 UTC +00:00>
Notionモデルから先ほど作成したものを取り出す
[8] pry(main)> n1 = Notion.first
Notion Load (0.8ms) SELECT `notions`.* FROM `notions` ORDER BY `notions`.`id` ASC LIMIT 1
=> #<Notion:0x0000ffffb0c92f88 id: 1, key: "cabf1c78b8f6496ba06197b8db6bab76", notionable_type: "Career", notionable_id: 1, created_at: Sat, 29 Jun 2024 07:39:18.366695000 UTC +00:00, updated_at: Sat, 29 Jun 2024 07:39:18.366695000 UTC +00:00>
notionインスタンスからはnotionableでcareerが取れる
[9] pry(main)> n1.notionable
Career Load (1.0ms) SELECT `careers`.* FROM `careers` WHERE `careers`.`id` = 1 LIMIT 1
=> #<Career:0x0000ffffb0ca0f20
id: 1,
user_id: 1,
title: "career title1",
description:
"Lorem ipsum dolor sit amet, consectetur adipiscing elit, sed do eiusmod tempor incididunt ut labore et dolore magna aliqua. Ut enim ad minim veniam, quis nostrud exercitation ullamco laboris nisi ut aliquip ex ea commodo consequat.",
started_at: Sun, 16 Jun 2024,
ended_at: Mon, 17 Jun 2024,
created_at: Sun, 16 Jun 2024 00:00:00.000000000 UTC +00:00,
updated_at: Sun, 16 Jun 2024 00:00:00.000000000 UTC +00:00>実装は以上です。
実はポリモーフィック関連付けはSQLのアンチパターンとして紹介される実装パターンです。
アンチパターンであるとされる理由は、notionable_idに外部キー制約を付与することができず、リレーション先のテーブルとの整合性の担保が難しいためです。(DBの外部キー制約は制約先のテーブルを指定する必要があるが、制約先のテーブルが特定されないため付与できない。親careerが消えているのに子notionが残ってしまい、うっかり子notionから親careerを呼び出そうとしたら予想に反してエラーを招く危険がある。)
それでも今回ポリモーフィック関連付けを採用したのは、Railsがポリモーフィック関連付けをサポートする機能を提供してくれていること・notionsからnotionable(career, blog, portfolio)を呼び出すことがほとんどなさそうなことからです。
便利な機能ではありますが、データ整合性の確保にリスクがあること・複雑な実装になるものには向かないことなどを考慮して、導入の検討は慎重に行いましょう。
Formオブジェクト
モデルの実装とリレーションができたので、フォームからnotionレコードを作成できるようにしていきます。
careerのnewやeditのフォームにnotionのページID(keyというカラム名にしています)を入力するinputを用意してそこに入力されたらnotionテーブルのkeyに保存されると便利です。
ですが、そのまま_career_form.html.erbにnotionのkeyを入れるためのtext_fieldを用意して保存しようにもunknown attribute 'notion_key' for Career.のようなエラーに遭遇されるかと思います。当然ですね。careerにはnotion_keyという属性はないのですから。
そこで、careerやnotionにパラメータを入れるのではなく、このフォームで操作したいnotionとcareerの両方の属性を持った自作オブジェクト(Formオブジェクト)を用意してこれを経由してcareerとnotionのsaveを実行しようというのがFormオブジェクトの全体像です。
それでは早速作成していきましょう。
置き場所はappの下のformsというディレクトリを用意してこの下にしてみました。
class CareerNotionForm
  include ActiveModel::Model
  include ActiveModel::Attributes

  attribute :title, :string
  attribute :started_at, :date
  attribute :ended_at, :date
  attribute :description, :string
  attribute :notion_key, :string

  validates :title, presence: true
  validates :description, presence: true, length: { maximum: 500 }
  validates :started_at, presence: true
  validates :notion_key, presence: true

  def initialize(career: Career.new, attributes: nil)
    @career = career
    attributes ||= default_attributes
    super(attributes)
  end

  def save
    return false if invalid?

    ActiveRecord::Base.transaction do
      career.assign_attributes(title:, started_at:, ended_at:, description:)
      career.save!
      notion = career.notion.presence || career.build_notion
      notion.assign_attributes(key: notion_key)
      notion.save!
    end
    true
  rescue
    false
  end

  def to_model
    career
  end

  def persisted?
    career.persisted?
  end

  private
  attr_reader :career

  def default_attributes
    {
      title: career.title,
      started_at: career.started_at,
      ended_at: career.ended_at,
      description: career.description,
      notion_key: career.notion_key
    }
  end
end
コントローラではこのように使います。
class CareersController < ApplicationController
  def index
  end

  def new
  end

  def create
    career_notion.assign_attributes(career_params)
    if career_notion.save
      flash[:success] = "Record successfully created"
      redirect_to careers_path
    else
      flash.now[:error] = "Failed to create Record"
      render :new
    end
  end

  def show
  end

  def edit
  end

  def update
    career_notion.assign_attributes(career_params)
    if career_notion.save
      flash[:success] = "Record successfully updated"
      redirect_to careers_path
    else
      flash.now[:error] = "Failed to update Record"
      render :edit
    end
  end

  def destroy
    if career.destroy
      flash[:success] = "Record successfully deleted"
      redirect_to careers_path
    else
      flash[:error] = "Failed to delete Record"
      redirect_to edit_career_path(career)
    end
  end

  private

  def user
    @user ||= User.first
  end

  def careers
    @careers ||= user.careers
  end
  helper_method :careers

  def career
    @career ||= careers.find_by(id: params[:id]) || careers.build
  end
  helper_method :career

  def career_notion
    @career_notion ||= CareerNotionForm.new(career:)
  end
  helper_method :career_notion

  def career_params
    params.require(:career).permit(:title, :started_at, :ended_at, :description, :notion_key)
  end
end
html.erbでは下記のようになります。
<%= form_with model: career_notion, class: "row g-3", data: {turbo: false} do |f| %>
  <div class="col-md-6">
    <%= f.label :title, "Title", class: "form-label" %>
    <%= f.text_field :title, class: "form-control" %>
  </div>
  <div class="col-md-3">
    <%= f.label :started_at, "Started at", class: "form-label" %>
    <%= f.date_field :started_at, class: "form-control" %>
  </div>
  <div class="col-md-3">
    <%= f.label :ended_at, "Ended at", class: "form-label" %>
    <%= f.date_field :ended_at, class: "form-control" %>
  </div>
  <div class="col-md-3">
    <%= f.label :notion_key, "Notion key", class: "form-label" %>
    <%= f.text_field :notion_key, class: "form-control" %>
  </div>
  <div class="col-12">
    <%= f.label :description, "Description", class: "form-label" %>
    <%= f.text_area :description, class: "form-control", rows: "5" %>
  </div>
  <div class="col-4">
    <%= link_to "Back", careers_path, class: "w-25 btn btn-secondary" %>
    <%= f.submit "Submit", class: "w-25 btn btn-primary" %>
  </div>
<% end %>
それでは、Formオブジェクトの中身について解説していきます。
include ActiveModel::Model
include ActiveModel::Attributes
→これはRailsが提供してくれるモジュールです。これがあることによって自作クラスがRailsのモデルに実装されている機能が付与されform_withの引数に使えるようになったりします。
  attribute :title, :string
  attribute :started_at, :date
  attribute :ended_at, :date
  attribute :description, :string
  attribute :notion_key, :string
→include ActiveModel::Attributesにより使える機能です。これらの属性がCareerNotionFormのインスタンスに付与されます。
def initialize(career: Career.new, attributes: nil)
@career = career
attributes ||= default_attributes
super(attributes)
end
→default_attributesのメソッドからattributesを作成してそれをsuperの引数にして初期値を設定します。newのタイミングで渡されたcareerやnotionの値はこのFormオブジェクトの属性の初期値になります。 def save
return false if invalid?
ActiveRecord::Base.transaction do
career.assign_attributes(title:, started_at:, ended_at:, description:)
career.save!
notion = career.notion.presence || career.build_notion
notion.assign_attributes(key: notion_key)
notion.save!
end
true
rescue
false
end
→saveされたときの挙動を制御します。invalid?はアクティブモデルが提供するメソッドです。バリデーションにかかるかどうかをチェックしてバリデーションエラーの場合は弾きます。
これを通った場合はcareerとnotionに値を付与してsaveをかけます。トランザクジョンブロックの中に入れてcareerとnotionの両方の保存の成功を担保します。
アクティブレコードのsaveメソッドはbooleanを返すので、rescueを使って成功した場合はtrueを。失敗の場合はfalseを返すようにしてあげます。 def to_model
career
end
def persisted?
career.persisted?
end
→これは一見コントローラやクラス内部で呼ばれていないメソッドですが、この後でform_withの引数にCareerNotionFormのインスタンスを渡すにあたって必要なメソッドです。
to_modelにcareerを返させることで、form_withが作成する送信時のパスの生成にcareerが用いられ、パスが通ります。
presisted?はeditかnewかの判定で用いられるメソッドです。form_withはnewのときは/careerのpostに送信します。editのときは/career/:idのpatchに送信します。この正常に行なってもらうために用意します。作成と更新をやってみて正常に保存されるでしょうか?
ブレークポイントを入れてみて動作を一つ一つ追ってみると理解が深まると思います。
formオブジェクトの導入部分の差分を用意しているので、変更があった箇所を確認してみてください
意外と差分は少ないです。
その他の実装
APIのレスポンス
notionのページIDを正常に作成・更新できるようになったのでapiでレスポンスするようにしましょう
career_serializer.rbにattributeを追加するのみです。
career.rbにnotionからkeyをdelegateするようにしたのでcareerにnotion_keyというメソッドを追加してよりシンプルになるようにしました。
delegate :key, to: :notion, prefix: true, allow_nil: trueshowページでnotion_keyを表示するようにしています。
 <div class="col-md-3">
      <small>Notoin key</small>
      <div class="fs-4"><%= career.notion_key %></div>
</div>差分はこちらです
フロントエンドの実装
apiのレスポンスにnotionKeyが含まれるようになったので、これをlinkに使えるようにします。
やることはresponseのnotionKeyに対応する値をCareerのモデルに追加してこれに割り当てます。
リンクの動的パスパラメータにnotionKeyを指定します
 <Link href={`/contents/${career.notionKey}`}>
        <div className={styles.content}>
          <div className={styles.head}>
            <div className={styles.title}>{career.title}</div>
            <div className={styles.period}>
              {career.startedAt} ~ {career.endedAt}
            </div>
          </div>
          <div className={styles.description}>{career.description}</div>
        </div>
</Link>最後に一覧ページのcareerの要素がリンクであることを伝えるためにhoverのcssを調整しました
おわりに
新しくポリモーフィック関連付けとFormオブジェクトを導入しました。
どちらもRailsの発展的な実装パターンなため一度では理解しきるのは難しかったかもしれません。
そんなときはやはりブレークポイントで一行一行処理を追ってみることをお勧めします。
まだまだblog機能、portfolio機能の実装が残っていますが、この二つともcareer機能と同じ作りになる想定です。そのため、これでこのポートフォリオ作成で使うテクニックは概ね紹介できたことになります。
次回はblog機能を作成する予定です。これまでの実装の総復習のような内容になると思います!


コメント